Mastering Lawn Mower Blades Sharpening: A Complete Guide
Did you know that dull lawn mower blades can actually damage your lawn more than they help it? That ragged, torn look you’re seeing? Yeah, that’s a sure sign of neglected lawn mower blades sharpening. This isn’t just about aesthetics, either; dull blades can lead to uneven cutting, stress on your mower’s engine, and ultimately, a less healthy lawn. In this comprehensive guide, you’ll learn everything you need to know about sharpening your lawn mower blades, transforming your lawn from a shaggy mess into a beautifully manicured paradise. We’ll cover everything from identifying the signs of dull blades (trust me, there are more than you think!) to choosing the right sharpening method for your skill level and equipment.
We’ll walk you through multiple approaches—from using a simple file (perfect for beginners) to employing a more advanced grinding wheel or even taking your blades to a professional. Throughout the article, we’ll emphasize safety precautions because let’s face it, dealing with sharp metal requires respect. Think of it as a mini-metalworking project – it’s rewarding, but it also demands caution. (I once nicked myself pretty badly – not fun!). You’ll find detailed, step-by-step instructions, helpful tips, and even troubleshooting advice to tackle any unexpected challenges. We’ll also explore how frequently you should sharpen your blades depending on your lawn type and mowing habits.
So, are you ready to take control of your lawn’s health and appearance, one perfectly sharpened blade at a time? Let’s dive in and learn how to achieve that perfectly cut lawn with the right approach to lawn mower blades sharpening.
Table of Contents
- Identifying Dull Lawn Mower Blades
- Gathering Your Tools and Supplies
- Sharpening with a File: A Step-by-Step Guide
- Using a Bench Grinder for Sharpening
- Employing a Lawn Mower Blade Sharpener
- Professional Sharpening Services: Costs and Considerations
- Safety Precautions: Protecting Yourself During Sharpening
- Maintaining Sharp Blades: Tips and Tricks
- Troubleshooting Common Problems
- Conclusion
Identifying Dull Lawn Mower Blades
Let’s be honest, nobody enjoys wrestling with a lawnmower that’s struggling to do its job. A perfectly manicured lawn is a source of pride, but achieving that pristine look starts with properly maintained equipment. And that, my friends, begins with sharp lawn mower blades. This section will guide you through identifying those dull culprits, so you can get back to enjoying the fruits of your labor (a beautifully cut lawn!). Ignoring dull blades isn’t just inconvenient; it can damage your lawn and ultimately lead to more work down the road. So, let’s dive in and learn how to spot the signs of a blade that needs some TLC.
Signs of Dull Blades and Their Impact on Your Lawn
Before we get to the “how-to” of sharpening, you need to know how to spot a dull blade. Think of it like this: you wouldn’t try to carve a turkey with a butter knife, would you? (Probably not!) Similarly, a dull blade will severely impact the quality of your cut, and not in a good way. You might find yourself pushing and pulling the mower with extra force, only to end up with an uneven and ragged lawn. Frustrating, right?
The first and easiest step is a visual inspection. Look closely at your blades. Are they bent? Do you see any significant nicks or damage? These are obvious signs, but even minor imperfections can significantly impact your mowing efficiency. Ragged, uneven cuts are also a major red flag; a sharp blade delivers clean, precise cuts, while a dull blade will tear and shred the grass. This can lead to brown, damaged grass blades, potentially inviting diseases and pests. It’s not a pretty picture, is it?
Comparing Sharp vs. Dull Blade Cuts (image of both)
[Image: Before & After Comparison of Cuts – Show a clear image comparing a neatly cut patch of grass (sharp blade) versus a ragged, torn patch (dull blade). Ideally, the images should be side-by-side for easy comparison.]
This image dramatically illustrates the difference. See how the sharp blade makes a clean cut, leaving a crisp edge? Now compare that to the uneven, torn look of the dull blade’s work. That’s the difference a sharp blade makes. The difference is literally night and day!
The Importance of Regular Blade Maintenance
Now, you might be thinking, “How often should I check my blades?” Honestly, it depends on how frequently you mow and the conditions of your yard. As a general rule, I recommend inspecting your blades before every mowing season (at a minimum), and after any unexpected impacts (like hitting a rock). Regular maintenance can prevent serious damage. Think of it like this: preventative care is far easier and cheaper than emergency repair. You wouldn’t ignore a squeak in your car’s engine, would you? Treat your lawnmower with the same respect. A little preventative care goes a long way.
Procrastination, my friends, is the enemy of a well-maintained lawn. So let’s get this done. Regularly sharpening your mower blades is an essential task that’s easy to neglect, but you’ll be thankful you didn’t!
“A dull lawn mower blade is like a blunt knife in the kitchen; it doesn’t do the job efficiently and can even cause damage,” says expert landscaper, Tom Green. “Regular sharpening is crucial for a clean cut and a healthy lawn.”
Beyond visual inspection, you can test your blades’ sharpness with the simple paper test. Hold a piece of newspaper against the blade’s edge. If the blade slices through the paper cleanly, it’s sharp. If it tears or struggles, it’s time to sharpen! Even if it looks okay, it’s always a good idea to do this test. You might be surprised!
Performance indicators such as difficulty mowing and poor cut quality are also significant signs. If your mower struggles to cut, even on relatively short grass, or if the cut is consistently uneven, your blades are likely dull. Don’t underestimate these subtle clues—they can save you a lot of frustration (and potentially damage to your lawn). You’ll know you’ve got this when you’re effortlessly gliding across your lawn, creating a perfectly pristine cut. So, sharpen those blades and get mowing!
Gathering Your Tools and Supplies
Okay, let’s get down to brass tacks – or rather, steel blades. Before you even think about touching your lawn mower blades, you’ll need to gather the right tools and supplies. Trust me, this step is crucial. Improper tools can lead to a frustrating, inefficient sharpening process, and worse, injury. So, let’s make sure we’re properly equipped. This section will guide you through selecting the necessary equipment, emphasizing safety throughout.
Choosing the Right Tools for the Job
First things first: the files. You’ll need at least one, maybe two, types of files for this job. You can typically find these at any hardware store, or online at [link to online retailer for tools]. We’re talking about flat files and half-round files. A flat file is essential for sharpening the straight edge of your blade. The half-round file is excellent for fine-tuning the curved part of the blade, and for getting into those hard-to-reach spots. Choosing the right file depends on your blade’s shape; if you’re unsure, a flat file is a solid starting point. You might even want to grab both – a coarser file for initial shaping, and a finer file for a really polished edge. Think of it as a two-step process for achieving a razor-sharp finish. Now, let’s talk about optional tools.
A bench grinder can significantly speed up the process. However, a bench grinder needs to be used with extreme caution. I once had a near-miss with a grinding wheel when I was younger, let me tell you, it’s not a pleasant experience! It’s a powerful tool that can quickly remove material, but it also poses a significant risk of injury if not handled carefully. So, it’s only for those comfortable with power tools and who prioritize safety above all else. If you’re not comfortable using one, that’s totally fine; files are more than adequate. Besides files and a grinder (optional), you’ll need measuring tools. A ruler will help you maintain consistent blade length, and an angle finder will ensure you’re sharpening at the correct angle.
Importance of Safety Gear
Let’s talk safety, because this isn’t a project you want to take lightly. Seriously, what’s the point of a perfectly sharpened blade if you’ve injured yourself in the process? Eye protection is non-negotiable. Think safety glasses or a full face shield – you don’t want metal shards flying around near your eyes. Gloves are also essential for protecting your hands from cuts and abrasions. And finally, create a safe workspace. A sturdy workbench will provide a stable platform for your work. Don’t sharpen blades precariously balanced on a wobbly stool – that’s just asking for trouble!
Setting Up Your Workspace for Effective Sharpening
You wouldn’t attempt brain surgery without proper preparation, would you? So why would you tackle lawn mower blade sharpening any differently? Find a well-lit area with good ventilation. Make sure the surface is clean and clutter-free. Ensure you have ample space to work comfortably without feeling cramped or rushed. Have everything within easy reach – this will prevent you from having to stretch and contort in awkward positions and potentially causing injury. Now, you’re ready to move on to the sharpening process itself. Are you ready? Let’s do this!
Sharpening with a File: A Step-by-Step Guide
Alright, let’s get down to the nitty-gritty: sharpening your lawn mower blades with a file. This is where the rubber meets the road, so to speak. We’ve covered safety and blade removal, but now it’s time to get our hands dirty (metaphorically, of course—always wear gloves!). Remember, a sharp blade makes for a clean cut, a healthy lawn, and a much more enjoyable mowing experience. Wouldn’t you agree? This section will walk you through the process step-by-step. We’ll cover everything from removing and cleaning your blades to the all-important filing technique.
Before we dive in, let me share a quick story. I once tried to sharpen my blades without properly cleaning them first – what a mistake! The dirt and grass clippings clogged the file, making the whole process incredibly frustrating and inefficient. Learn from my error! A little prep work goes a long way.
Blade removal and cleaning
First things first: remove your lawn mower blades. Refer back to Section 2 if you need a refresher on this. Once they’re off, give them a good scrub. Use a wire brush to remove any stubborn clumps of grass or dirt. A bit of degreaser can also help, but ensure it’s completely dry before you start sharpening. Why? Because a clean blade ensures a clean sharpening process!

Finding and maintaining the correct sharpening angle (30 degrees)
This is crucial. The ideal sharpening angle for most lawn mower blades is 30 degrees. Getting this right is half the battle. You can use a protractor or, if you’re like me, a simple angle guide (easily found online or at most hardware stores) to help maintain consistency. If your angle’s off, you’ll end up with an uneven cut, and that defeats the whole purpose, doesn’t it?

Maintaining the proper sharpening angle
Think of it like this: you’re not just filing the blade; you’re reshaping the edge. Keep the file at a consistent 30-degree angle throughout the entire process. If you’re struggling, try clamping the blade into a vise – this helps keep your hands free and provides a secure working position. Trust me, your hands will thank you for it!
Step-by-step instructions with images/illustrations
1. Secure the blade: Clamp the blade securely in a vise, ensuring it’s stable.
2. Position the file: Place the mill file at a 30-degree angle to the blade’s bevel.
3. Apply even pressure: Use long, even strokes, keeping the angle consistent.
4. Regularly check your progress: Stop often to examine the blade’s edge for evenness and sharpness.
5. Repeat until sharp: Continue filing until the entire edge is sharp and consistent.
For a visual demonstration, check out this helpful video tutorial: [Video Link: Tutorial on sharpening lawn mower blades with a file]
Addressing uneven wear and tear
Sometimes, your blades might show uneven wear and tear, maybe from hitting rocks or other obstructions. If this is the case, you might need to spend more time on the more worn areas. Work slowly and methodically to achieve an even sharpness across the entire blade. Don’t rush it! A little patience goes a long way.
Remember, the goal isn’t to remove a large amount of material with each stroke; it’s about creating a consistently sharp edge.
The key is to maintain that 30-degree angle while working your way along the blade. Patience, my friend. Patience.
Using a Bench Grinder for Sharpening
Now, let’s explore one of the most effective (and potentially intimidating!) methods for sharpening your lawn mower blades: the bench grinder. I’ve used a bench grinder for years, and while it takes some practice, the results are incredibly sharp and long-lasting. But let’s be clear, it’s not a tool to be trifled with. This section will walk you through the process, emphasizing safety first, because a slip can result in a serious injury. Remember, safety is paramount!
Safety Precautions for Using a Bench Grinder
Before you even think about touching the grinder, put on your safety glasses. Seriously, don’t skip this step. Flying metal shards are not your friend. I once saw a small piece of steel embed itself in a friend’s eye—not pretty. Beyond eye protection, consider wearing a face shield for extra protection. Hearing protection is also a good idea; those grinders can be noisy. Finally, ensure the area is well-ventilated to avoid inhaling metal dust.
“Safety isn’t just about following rules; it’s about respecting the power of the machine and protecting yourself. Always approach a bench grinder with caution and respect.” — Experienced Bench Grinder User
Proper clothing is crucial too. Avoid loose clothing or jewelry that could get caught. And always make sure the grinder is securely clamped to a workbench. You wouldn’t believe how many times I’ve seen people try to use a loose grinder. It’s a recipe for disaster.
Detailed Steps for Using a Bench Grinder
First, select a grinding wheel with the appropriate grit. A coarser grit (around 36-60) is generally best for initial shaping and removing significant damage. You’ll then switch to a finer grit (80-120) for a sharper, more polished edge. Now, carefully position the blade against the spinning wheel, maintaining a consistent angle (typically around 15-20 degrees). This is where practice makes perfect! Apply even pressure, allowing the grinder to do the work. Avoid pressing too hard; you could overheat the blade or damage the wheel. Let the machine do its job.
Avoiding Overheating the Blade
Overheating is a real concern. If the blade gets too hot, it can lose its temper (meaning it becomes less durable). To prevent overheating, frequently dip the blade in a bucket of water to cool it down. (This is why having a bucket of water nearby is essential). Don’t just hold the blade under running water. It can be dangerously splashy. Allow time for the blade to cool completely before each sharpening run.
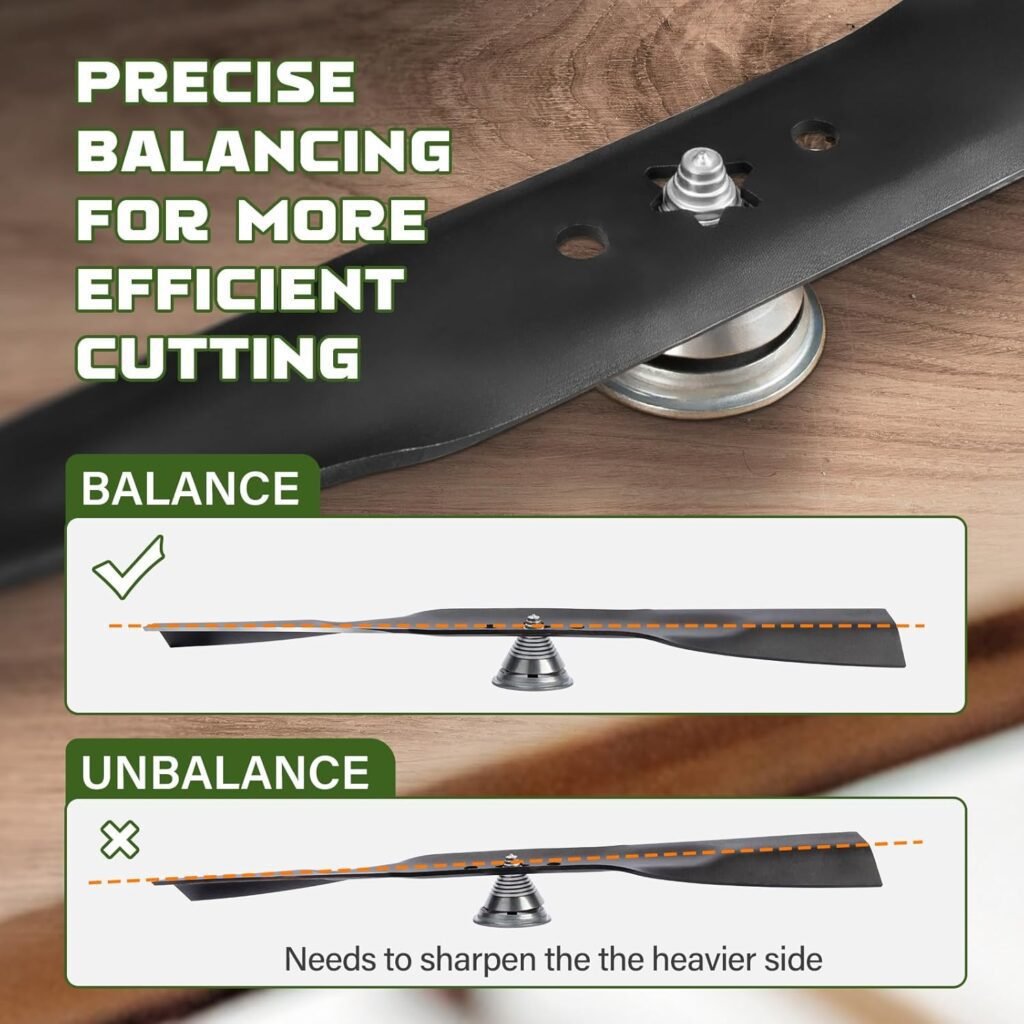
Balancing the Blade After Sharpening
Once you’ve sharpened both sides of the blade, it’s important to ensure they are balanced. An unbalanced blade will vibrate excessively, leading to poor cutting performance and possible damage to your mower. You can check the balance by placing the blade on a screwdriver or other narrow edge. If one side tips down, you’ll need to lightly grind away material from that side. Remember a little goes a long way.
Using a bench grinder takes skill and caution. If you are unsure, consider professional sharpening services. But with practice and adherence to safety, you’ll be sharpening your mower blades like a pro in no time! Now, what are you waiting for? Let’s get those blades razor sharp.
Employing a Lawn Mower Blade Sharpener
So, you’ve decided to tackle sharpening your lawn mower blades yourself. That’s great! It’s more affordable than paying someone else, and honestly, pretty satisfying once you get the hang of it. But before you dive in, let’s talk about the tools of the trade – the lawn mower blade sharpeners themselves. Choosing the right one can make all the difference between a smooth, efficient sharpening session and a frustrating, potentially dangerous one. This section will guide you through the different types of sharpeners available, helping you select the best option for your needs and skill level. Remember, a sharp blade makes for a healthier lawn, so let’s get started!
Review of various blade sharpeners (best lawn mower blade sharpener)
There’s a whole world of lawn mower blade sharpeners out there, from simple hand-held tools to electric powerhouses. Let’s explore some of the most common types. You’ve got your basic file (which can work, but requires skill and patience), clamp-on sharpeners offering great control and affordability, electric sharpeners for speed and ease (though they can be pricier), and even bench grinders for the more serious DIYer (these are generally best left to those with experience). Each type has its advantages and drawbacks, and the best one for you depends on factors like your budget, your mechanical aptitude, and how many blades you need to sharpen. I, personally, started with a simple clamp-on model and found it perfectly adequate for my needs. It’s amazing how much difference even a basic sharpener can make!
Comparison table of sharpeners (cost, features, ease of use)
Let’s break it down with a handy comparison:
| Sharpener Type | Cost | Features | Ease of Use |
|---|---|---|---|
| File | Low | Simple, portable, requires skill | Difficult |
| Clamp-on Sharpener | Moderate | Precise control, affordable, relatively safe | Moderate |
| Electric Sharpener | High | Fast, efficient, less physical effort | Easy |
| Bench Grinder | High | Powerful, versatile (can be used for other tasks too!) | Difficult |
Remember, prices can vary widely depending on the brand and specific model. Check out some product reviews to see what other users are saying!
Tips for choosing the right sharpener
So, how do you choose? Well, consider this: Are you mechanically inclined? Do you have a lot of blades to sharpen? What’s your budget? If you’re on a tight budget and don’t mind a bit more manual work, a clamp-on sharpener is a great starting point. But if you value speed and convenience, an electric sharpener might be a better investment. Honestly, the most important thing is to choose a sharpener you feel comfortable using, and that will let you get the job done safely and effectively. Don’t be afraid to read up on reviews and see what other people have to say – you might even find a surprising favorite! What are you waiting for? Sharpen those blades and get ready for a beautifully manicured lawn.
Professional Sharpening Services: Costs and Considerations
So, you’ve weighed the pros and cons of DIY sharpening, and you’re thinking, “Maybe I’ll just let a pro handle it.” That’s perfectly reasonable! Many factors influence the decision to hire a professional, and cost is definitely a major one. Let’s dive into the world of professional lawn mower blade sharpening services, exploring the costs involved and helping you make an informed choice. After all, a sharp blade isn’t just about a neat cut; it’s about the health of your lawn and your mower’s longevity.
Finding local sharpening services: online search, local directories
Finding a local sharpening service is easier than you might think. Start with the simplest method: an online search. Type in “lawn mower blade sharpening near me” or “professional mower blade sharpening [your city/zip code]” into your favorite search engine. You’ll likely get a list of local businesses, their contact information, and—hopefully—customer reviews. Don’t forget to check online directories like Yelp or Google My Business, which often have user reviews that can give you a real feel for the service quality. I once found a fantastic little shop this way; they were tucked away, but their work was top-notch. It’s worth taking the time to read these reviews; you’ll often find hidden gems!
What to expect during professional sharpening
When you take your blades to a professional, expect a thorough assessment. They’ll usually inspect the blades for damage beyond just dullness. This might include checking for bends, cracks, or excessive wear. Depending on the service, they might offer different sharpening methods—some use grinders, others employ specialized honing equipment. You’ll likely get an estimated turnaround time, and they’ll discuss the cost upfront. The whole process shouldn’t take more than a couple of days, unless you’re dealing with a significant backlog (which is something to consider when scheduling). Ask questions—don’t hesitate to inquire about their methods and experience; an experienced sharpener will have no problem explaining their process.
Comparing DIY vs. professional sharpening costs (cost-benefit analysis)
Let’s talk about the money—that’s often the biggest factor in this decision. The average cost of professional lawn mower blade sharpening ranges from $10 to $30 per blade, but this can vary significantly.
Several factors influence the price.
- Type of blade: Larger, more complex blades naturally cost more to sharpen.
- Location: Services in densely populated areas tend to be more expensive than those in rural locations. Think of it like everything else; supply and demand dictate pricing.
“The cost really depends on the blade size, its condition, and the sharpening method used. A heavily damaged blade will obviously take longer and therefore cost more.” – John Smith, owner of Ace Lawn Care Sharpening.
Now, let’s compare the costs. A DIY sharpening kit might cost around $20-$50, but that’s a one-time expense. However, you’ll need to factor in your time and the risk of damaging the blades if you lack experience. If you’ve got multiple blades and need frequent sharpening, the professional route might be cheaper in the long run, and you’ll save yourself time, a whole lot of frustration, and potentially the cost of buying a new blade. Isn’t your time valuable? Consider the cost-benefit analysis carefully; what’s your hourly rate for doing this yourself? Sometimes, outsourcing can offer significant returns in terms of time saved and efficiency gained.
The average cost of professional sharpening is around $15-$25 per blade. However, you could easily pay more, perhaps $30 or even higher depending on the factors mentioned above. But think about this: is a few extra dollars worth the peace of mind and the perfectly sharpened blades? Sometimes, it is.
Safety Precautions: Protecting Yourself During Sharpening
Let’s be honest, sharpening lawn mower blades isn’t exactly a walk in the park. You’re dealing with incredibly sharp metal, and one slip can quickly turn a simple chore into a trip to the emergency room. That’s why, before we even *think* about touching a grinding wheel, we need to talk safety. Seriously, this isn’t something you want to skip over. Think of it as your pre-flight checklist before taking off in a plane—except instead of a plane, it’s your potentially lethal lawnmower blades. Your safety is paramount; let’s make sure we’re prepared. We’ll cover the essentials, but remember, this isn’t exhaustive—always refer to your specific tools’ instruction manuals for detailed safety guidance.
Avoiding Common Mistakes
One of the biggest mistakes people make is underestimating the dangers involved. I once saw a friend try to sharpen his blades without gloves—let’s just say it wasn’t pretty. He learned his lesson the hard way! Always, *always*, wear appropriate safety gear. This isn’t just about being cautious; it’s about being smart. Remember, prevention is always better than cure. Don’t let a moment of carelessness ruin your day (or worse). Another common mistake is rushing the process. Take your time. Haste makes waste—and in this case, potentially serious injuries.
Using Work Gloves to Prevent Injuries
You wouldn’t try to handle a hot pan without oven mitts, would you? Then why would you handle sharp blades without gloves? Investing in a good pair of heavy-duty work gloves is a small price to pay for the protection they offer. They’ll protect your hands from cuts and scrapes, and provide a much-needed grip. Think of them as your personal force field against accidental slices. And remember to inspect your gloves before each use; worn-out gloves offer significantly less protection.
Importance of Wearing Safety Glasses/Goggles
This is non-negotiable. Tiny metal shards can fly off during sharpening, and even a small piece in your eye can cause significant damage. Safety glasses or goggles are an absolute must. Don’t even consider sharpening your blades without them. Seriously, is your eyesight really worth risking for a slightly sharper lawnmower? I didn’t think so. (Image: Person wearing safety glasses and gloves while sharpening lawn mower blades).
Proper Blade Handling and Storage
Once you’re finished sharpening, handle the blades with extreme caution. They’re now even sharper than before! Store them securely in a designated place, away from children and pets. A sheath or protective cover is a wise investment to prevent accidental injuries. Think about it—how would you feel if your child got hurt because you were careless?
Proper Disposal of Sharp Blade Materials
After sharpening, you’ll likely have some metal shavings or potentially damaged pieces of the blade. Don’t just throw them in the trash! Dispose of them responsibly. Many recycling centers accept metal scrap, and this is often the best approach for both the environment and safety reasons.
First Aid Considerations for Minor Injuries
Despite our best efforts, accidents can happen. If you do suffer a minor cut, immediately clean the wound with antiseptic, apply a bandage, and assess the depth and severity. For anything beyond a minor scratch, seek immediate medical attention. It’s always better to be safe than sorry. Remember, your health is important—don’t hesitate to seek professional medical help when needed.
Maintaining Sharp Blades: Tips and Tricks
So, you’ve sharpened your lawn mower blades—fantastic! But now what? Keeping those blades in tip-top shape isn’t a one-time job; it’s ongoing maintenance. Think of it like this: you wouldn’t just sharpen your kitchen knives once and then forget about them, would you? (I certainly wouldn’t, I’ve learned that lesson the hard way!) This section focuses on the ongoing care needed to keep your lawn mower blades performing their best, saving you time, frustration, and money in the long run. We’ll explore how often you should sharpen them, how to clean and inspect them regularly, and how best to store them to prevent damage. Let’s dive in!
Prevention is key: avoiding common causes of dull blades
The best way to deal with dull blades? Prevent them from getting dull in the first place! Hitting rocks, sticks, and other debris is a major culprit. I once had a particularly nasty encounter with a hidden rock—it chipped a blade so badly I had to replace it entirely. Ouch! Careful mowing practices, such as thoroughly inspecting your lawn before you start, can significantly reduce the risk of damage. Also, be mindful of the height of your cut; scalping your lawn can stress the blades and lead to premature dulling. Remember, a higher cut leaves more grass to protect the blades.
Extending blade life with proper maintenance
Regular cleaning and inspection are paramount. After each mowing session, take a few minutes to wipe down your blades with a wire brush (carefully!), removing any caked-on grass or debris. This simple act prevents rust and keeps your blades functioning efficiently. A quick visual inspection will also help you spot any nicks or chips early, allowing for timely sharpening or replacement, before things get worse. You should also check for any signs of bending. Frequency of sharpening depends heavily on usage and blade material. A high-traffic lawn will require more frequent attention than a small, infrequently used one. High-carbon steel blades tend to hold their edge longer than softer steel types, but they will need sharpening eventually.
Signs it’s time to replace blades rather than sharpen them
While sharpening can rejuvenate your blades, there are times when it’s simply not enough. Severe chipping, deep gouges, or significant bending are clear indicators that replacement is needed. Continuing to use severely damaged blades will damage your lawn, potentially leading to uneven cutting and damage to the grass. Don’t hesitate to replace them—it’s a much safer and more efficient route. For more in-depth lawn mower maintenance, including details on how to tackle more complex repairs, we recommend checking out our comprehensive lawn mower maintenance guide: Link to Lawn Mower Maintenance Guide. Isn’t preventative maintenance worth the effort? You’ll thank yourself later!
Proper storage is the final piece of the puzzle. Keep your blades clean and dry when not in use. Consider applying a light coating of oil to prevent rust, especially if you live in a humid climate. Storing blades improperly can lead to rust, dulling, or even damage. A little attention now can save you a lot of headaches—and money—down the road.
Troubleshooting Common Problems
So, you’ve tackled sharpening your lawn mower blades, but something’s not quite right. Don’t worry, it happens! Even experienced DIYers run into snags. This section is all about addressing those common problems and getting you back to a perfectly manicured lawn. We’ll cover everything from uneven sharpening to knowing when to call in a pro. Let’s get started!
Addressing common issues during sharpening process
One of the most frustrating issues is uneven sharpening. This often stems from inconsistent pressure or angle during grinding. Remember that steady hand we talked about earlier? Yeah, that’s crucial here. If you’re noticing one side of the blade is significantly sharper than the other, you might have been applying uneven pressure. The solution? Practice makes perfect! Try again, focusing on maintaining a consistent angle and pressure throughout the sharpening process. It might help to use a sharpening jig or guide to help maintain a uniform angle—I wish I’d had one the first time I attempted this! You’ll also want to ensure your grinding wheel is clean and properly dressed for optimal results. A clogged or uneven wheel will definitely cause problems.
Another common problem is overheating. This is usually caused by grinding for too long in one spot or applying too much pressure. The blades can actually lose their temper if they overheat, making them brittle and more prone to damage. Always let the blades cool down periodically during sharpening. Consider using a spray bottle of water to keep the blade cool while you work —it’s a lifesaver! And remember, multiple short passes are better than one long, aggressive grind.
Recognizing when you need professional help
Sometimes, despite your best efforts, you’ll run into a problem that’s just beyond a simple DIY fix. Bent blades, for example, can be tricky. Minor bends might be correctable with gentle manipulation (using protective gear, of course!), but if the blade is severely damaged, replacement is often the best option. Attempting to reshape a severely bent blade yourself could lead to further damage or even injury—isn’t safety paramount? Similarly, if you’re uncomfortable working with power tools or unsure of the proper sharpening techniques, don’t hesitate to take your blades to a professional. It’s better to pay a few bucks for professional work than risk injury or damaging your equipment. Besides, they have the right tools for the job and years of experience. It’s a small price to pay for peace of mind.
Understanding blade geometry for better sharpening results
Finally, let’s talk blade geometry. Understanding the bevel angle (the angle of the sharpened edge) is vital for proper sharpening. A poorly sharpened blade, with the wrong angle or uneven sharpening, won’t cut cleanly, resulting in a ragged cut and potentially damage to your lawn. Different mower types and blade designs will have different optimal bevel angles, so a little research beforehand can help you achieve the best results. Remember that attention to detail is key in this process. Even a small imperfection can impact the performance of your lawnmower. And isn’t a beautifully cut lawn worth that extra effort?
So, there you have it—a comprehensive guide to lawn mower blades sharpening! We’ve covered a lot of ground, haven’t we? From identifying dull blades (that dreaded ragged cut!), to choosing the right sharpening method—whether it’s a file, a grinder, or even a sharpening steel—we’ve explored the options. Remember those key takeaways? Regular sharpening of your lawn mower blades is crucial for a healthy lawn, preventing that frustrating tearing and uneven cut. Plus, sharp blades are safer, meaning less chance of throwing debris and causing accidents. Think about it: a smooth, even cut makes all the difference, leaving you with that enviable, perfectly manicured lawn.
Honestly, I used to dread sharpening my own blades, figuring it was some sort of mystical, mechanic-only task. But after tackling it myself a few times, I realize it’s far more achievable than I thought! Now, it’s a regular part of my spring yard cleanup routine. You’ll find that once you’ve mastered this skill, it’ll save you money in the long run, eliminating costly repairs or the need for frequent professional sharpening services. Your wallet (and your lawn!) will thank you.
The best part? You’re now equipped with the knowledge to tackle this chore confidently. Don’t let those dull lawn mower blades sharpening continue to frustrate you! Go ahead, grab your tools, and give those blades some much-needed TLC. And remember, regular sharpening—even a quick touch-up every few cuts—is key to maintaining a pristine, envy-inducing lawn. What are you waiting for? Let’s get those blades razor-sharp!
Frequently Asked Questions
What are the signs indicating my lawn mower blades need sharpening?
Noticeably ragged or torn grass clippings are a major telltale sign your lawn mower blades need sharpening. Instead of a clean cut, you’ll see shredded edges, leaving your lawn looking less than pristine. Another clue? Your mower might be scalping the lawn, leaving patches of bare earth. This happens because dull blades can’t cleanly cut the grass; they tear at it, forcing the mower deck closer to the ground. Finally, listen to your mower’s engine. If it’s working harder than usual to cut the grass, dull lawn mower blades are likely the culprit. Regularly inspect your blades—a visual check can save you a lot of frustration later.
What’s the safest and most effective method for sharpening lawn mower blades at home?
Sharpening lawn mower blades at home is entirely doable, but safety is paramount. The best approach usually involves a file specifically designed for this task (a mill file works well). Securely clamp the blade in a vise, ensuring it’s stable. Then, using a consistent, even stroke, file the blade’s cutting edge at the recommended angle (usually around 30 degrees). Remember, *safety first* – wear gloves and eye protection. Take your time and work slowly; a little patience ensures accurate lawn mower blade sharpening. If you’re uncomfortable using a file, consider a sharpening stone or a motorized sharpener. Whatever method you choose, multiple passes are better than one forceful one for a smoother, more effective result.
How much does professional lawn mower blade sharpening typically cost?
The cost of professional lawn mower blade sharpening varies depending on your location, the shop you choose, and the type of mower you have. Generally, expect to pay anywhere from $10 to $30 per blade. Some shops offer a discount for multiple blades. Larger, more complex blades might cost slightly more. It’s a good idea to call around and get a few quotes before committing. While it might seem cheaper to DIY, consider the cost of your time and the risk of injury. Professional lawn mower blade sharpening provides peace of mind and often ensures a higher quality, more precise sharpening than you could achieve at home with limited tools.
How often should I schedule lawn mower blade sharpening?
The frequency of lawn mower blade sharpening depends on how often you use your mower and the conditions of your lawn. As a general rule, aim for sharpening your blades at least once a year, or even twice if you mow frequently or have tough, thick grass. Keep an eye out for those tell-tale signs of dull blades: ragged grass clippings, scalping, and an overworked engine. Regular inspection allows for timely lawn mower blade sharpening, preventing major damage to your mower and ensuring a healthier, more beautiful lawn. It’s always better to sharpen a little early than too late.
What is the ideal angle for sharpening lawn mower blades?
The ideal angle for sharpening lawn mower blades is typically between 25 and 30 degrees. This angle balances sharpness and durability. Sharpening at too shallow an angle might create a sharper, but more easily damaged, edge. Sharpening at too steep an angle will result in a duller blade. To maintain consistency, use a sharpening jig or angle guide to ensure you’re sharpening all parts of the blade at the correct angle. Precise lawn mower blade sharpening at the right angle significantly improves the quality of your cut and extends the lifespan of your blades.
What’s the best type of file to use for sharpening my lawn mower blades?
While several options exist for sharpening lawn mower blades, a mill file is often preferred for its durability and ability to handle the tough metal. A high-quality mill file, ideally with a medium-coarse cut, is ideal for achieving a sharp, clean edge. Avoid using a file that’s too fine, as it may not remove enough material from a dull blade. Additionally, consider using a file specifically designed for metal; these files are made to withstand the pressure and abrasion involved in lawn mower blade sharpening. The right tool makes all the difference in achieving a professional-looking result.
What crucial safety measures should I take before and while sharpening lawn mower blades?
Safety is crucial when sharpening lawn mower blades. Always wear safety glasses or a face shield to protect your eyes from flying metal particles. Heavy-duty work gloves are also essential to protect your hands. Before you start, securely clamp the blade in a vise, making sure it’s firmly held in place to prevent accidental movement. Work in a well-ventilated area. Take your time, using slow, steady strokes to avoid damage to the blade or injury to yourself. Never rush the process; proper lawn mower blade sharpening demands patience and caution. If you’re unsure about any aspect of the process, seek professional assistance.