When to Dethatch Your Lawn: A Comprehensive Guide for Lush, Healthy Grass
Did you know that a thatch layer more than half an inch thick can seriously stifle your lawn’s growth? That’s right, that seemingly innocuous layer of dead grass and organic matter can be the enemy of a lush, healthy lawn. This article is your complete guide to understanding when and how to dethatch your lawn, ensuring a vibrant green space you can be proud of.
You’ll learn everything you need to know to tackle this crucial lawn care task effectively. We’re not just talking about wielding a dethatching rake (although we’ll cover that too!); we’ll delve into the science behind thatch buildup, helping you understand why dethatching is sometimes necessary and sometimes not. Think of it as preventative lawn care, rather than a cure-all. This article will help you determine if your lawn even needs dethatching.
Specifically, we’ll explore how to identify the telltale signs of excessive thatch—those pesky brown patches and spongy feel underfoot. You’ll discover the ideal time of year to dethatch your lawn, depending on your climate and grass type. (This varies greatly from region to region, so pay attention!) We’ll walk you through different dethatching methods, from the manual approach to renting power equipment. We’ll even discuss when you might need professional help. Finally, we’ll offer post-dethatching care tips to ensure your lawn recovers quickly and thrives.
So, are you ready to learn how to give your lawn the best chance to flourish? Let’s dive into the world of dethatching and unlock the secrets to a healthy, vibrant yard.
Table of Contents
Section 1: Understanding Thatch: Identifying the Need for Dethatching
Let’s get down to the nitty-gritty: before you even think about grabbing that dethatching rake, you need to understand what you’re dealing with. This section focuses on identifying if your lawn truly needs dethatching. Otherwise, you might be doing more harm than good! (Trust me, I’ve been there).
Defining Thatch and its Composition
Thatch is a layer of dead and decaying organic matter that accumulates between the soil surface and the actively growing grass blades. It’s essentially a mixture of stems, roots, and leaves that haven’t fully decomposed. Think of it as a kind of lawn “mulch,” but too much of a good thing can be detrimental. This layer is made up of different materials in varying stages of decomposition. A healthy lawn naturally produces some thatch, but an excessive buildup is where the problems start.
Explaining the Negative Effects of Excessive Thatch on Lawn Health
Excessive thatch acts like a barrier, preventing water, air, and nutrients from reaching your grass roots. This leads to several problems. Water can’t penetrate the thick layer, causing runoff and dryness, even after watering. Poor air circulation suffocates the grass roots, making them weak and susceptible to disease. And finally, those essential nutrients you’re carefully feeding your lawn? They’re getting trapped in the thatch layer instead of nourishing your grass. It’s like trying to feed a plant through a thick blanket – ineffective and frustrating!
Imagine this: you’ve diligently watered and fertilized your lawn, only to see it remain stubbornly yellow and patchy. That thick thatch layer could be the culprit!
Visual Inspection Techniques
The first step in determining if you need to dethatch is a simple visual inspection. Walk across your lawn and look closely. Does it feel spongy or bouncy underfoot? That’s a strong indicator of thatch buildup. Does it have a matted, brown appearance? This is another telltale sign. You might also notice that the grass blades appear to be sitting on top of a layer rather than growing directly from the soil.
The Thatch Test (Physical Assessment)
Beyond a visual assessment, perform the “thatch test.” Use a trowel or gardening knife to carefully slice a vertical section of your lawn, ideally about 4 to 6 inches deep. Examine the section closely. The thickness of the organic layer between the soil and the green grass blades is your thatch layer. Measuring the depth will give you a more accurate assessment.
Understanding Different Thatch Levels (thin, moderate, thick)
| Type of Thatch | Thickness (inches) | Impacts | Action Needed |
|---|---|---|---|
| Thin | Less than ½ inch | Minimal impact on lawn health. | None, regular maintenance sufficient |
| Moderate | ½ inch to ¾ inch | May slightly impede water and nutrient penetration. | Monitor closely, consider aeration |
| Thick | Over ¾ inch | Significantly hinders water, nutrient, and air penetration; prone to disease. | Dethatching is highly recommended. |
“Addressing thatch buildup is crucial for long-term lawn health. Ignoring it can lead to a decline in grass vigor, increased susceptibility to pests and disease, and ultimately, a less beautiful lawn.” – Dr. Emily Carter, Turfgrass Specialist
Signs you need to dethatch:
- Your lawn feels spongy underfoot.
- You notice a thick, brown layer between the soil and the grass blades.
- Water drains poorly from your lawn, even after light rain.
- Your lawn is more susceptible to disease or pest infestations.
- The grass is growing poorly despite proper fertilization and watering.
- Patches of dead or yellow grass are appearing.
So, are you ready to assess your lawn’s thatch level? Let’s move on to the next section!
When to Dethatch Your Lawn: Section 2 of 8 – Best Time to Dethatch Your Lawn: Spring vs. Fall
So, you’ve decided dethatching is in your lawn’s future. Excellent! But when’s the best time to do it? Spring or fall? That’s the million-dollar question, and honestly, there’s no single right answer. It depends on a lot of factors, which we’ll explore in this section. Let’s analyze the pros and cons of each season.
Spring Dethatching: Timing and Considerations
Spring dethatching, typically done in early spring after the last frost but before your grass actively starts growing, offers some advantages. You’re giving your lawn a fresh start, removing that winter’s accumulated thatch before it hinders new growth. This can lead to a thicker, healthier lawn come summer. However, it can be stressful for your lawn if done too early or aggressively, potentially leaving it vulnerable to disease or pests. Imagine trying to get a head start on a marathon but tripping at the starting line—not ideal! We want a healthy start, not a setback.
Fall Dethatching: Timing and Considerations
Fall dethatching, usually in early fall before the first frost, gives your lawn time to recover and strengthen its root system before winter hits. Thatch removal in fall allows for better nutrient absorption, helping your grass prepare for the colder months. The downside? You might not see the full benefits until the next spring, and fall’s often busier with other yard work. Plus, if you dethatch too late, you could potentially weaken your lawn before winter.
Regional Climate Influences
The ideal time for dethatching varies significantly based on your region’s climate. A cool-season grass lawn in the Pacific Northwest will have a different optimal dethatching window than a warm-season lawn in Florida. (I’ve learned this the hard way after a disastrous spring dethatching in my first year!)
Here’s a helpful guide:
| Region | Best Dethatching Months |
|---|---|
| North (Zones 3-6) | September – October |
| Mid-Atlantic (Zones 7-8) | April – May or September – October |
| South (Zones 9-11) | March – April or September-October |
“The best time to dethatch is really dictated by your local climate and the type of grass you have,” says renowned landscape expert, Dr. Evelyn Reed. “Pay attention to your grass’s growth cycle – you want to dethatch when it’s actively growing but not under extreme stress.”
Factors affecting the ideal dethatching time include:
- Your specific grass type (cool-season vs. warm-season)
- Your region’s average first and last frost dates
- Your lawn’s overall health and thickness of thatch
- The amount of rainfall you’ve received recently.
So, when should you dethatch? Consider the factors above, and maybe consult with a local gardening expert for personalized advice. It’s worth the effort to get it right!
Section 3: Tools and Equipment for Dethatching Your Lawn
Now that we’ve figured out when to dethatch, let’s talk about how. This section dives into the essential tools and equipment you’ll need to tackle that pesky thatch. Choosing the right tool depends heavily on the size of your lawn and the severity of the thatch buildup. Let’s explore your options!
Manual Dethatching Tools
For smaller lawns (think less than 500 square feet) or light thatch, manual dethatching might be perfectly adequate. I’ve used a metal rake myself in the past for spot-treating areas, and it worked surprisingly well – at least for a small section. But believe me, you’ll feel it the next day!
Here’s a breakdown of some common manual tools:
- Metal Garden Rake: Pros: Inexpensive, good for light thatch, readily available. Cons: Labor-intensive, time-consuming, not ideal for large areas or heavy thatch. (Trust me, your back will thank you for choosing power equipment if you have a large lawn!)
- Thatching Hoe/Hand Rake: Pros: Designed specifically for removing thatch, more efficient than a regular rake. Cons: Still requires significant physical effort, not suitable for extensive thatch problems. [Image: Metal garden rake] [Image: Thatching hoe]
Power Dethatching Tools
For larger lawns or heavier thatch build-up, power tools are the way to go. They significantly reduce the labor involved. These tools can be rented or purchased, each with its own benefits and drawbacks.
- Power Rake (Gas or Electric): This is essentially a motorized version of the metal rake. Pros: Faster than manual dethatching, covers more ground efficiently. Cons: Can damage grass if not used correctly (especially with gas powered models!), requires more storage space. [Image: Power rake]
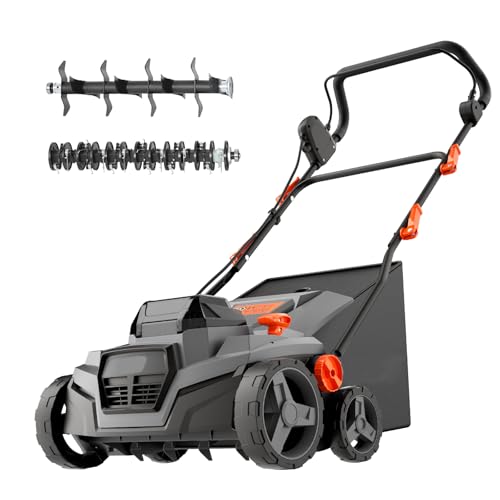
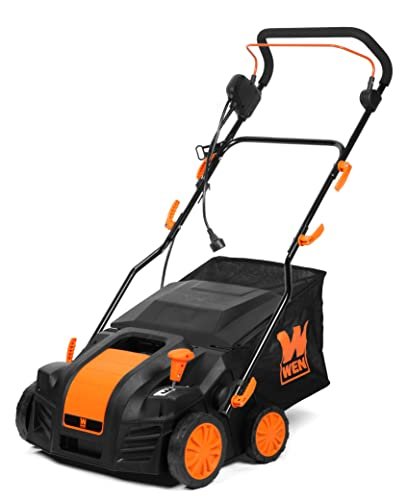
- Dethatching Machine (Vertical Mower): These are seriously powerful machines, ideal for thick thatch. They slice through the thatch layer, allowing it to be removed effectively. Pros: Extremely efficient, best for serious thatch problems. Cons: Expensive (both to buy and rent), can damage grass if not properly used, needs considerable skill to avoid damaging the lawn. [Image: Dethatching machine]
Choosing the Right Tool for Your Needs
The best tool for you depends on a few factors: your lawn size, the severity of the thatch, and your budget. Consider this: would you rather spend a weekend with a metal rake, or a couple of hours with a power rake?
| Equipment | Cost (Estimate) | Effectiveness | Suitability |
|---|---|---|---|
| Metal Rake | $15 – $30 | Low | Small lawns, light thatch |
| Thatching Hoe | $20 – $40 | Medium | Small to medium lawns, light-medium thatch |
| Power Rake (rental) | $30 – $75/day | High | Medium to large lawns, all thatch levels |
| Power Rake (purchase) | $200 – $500 | High | Medium to large lawns, all thatch levels |
| Dethatching Machine (rental) | $75 – $150/day | Very High | Large lawns, heavy thatch |
| Dethatching Machine (purchase) | $500 – $1500+ | Very High | Large lawns, heavy thatch |
Don’t forget to consider renting versus buying. If you only dethatch once a year, renting is often more economical. But if you have a large lawn and heavy thatch issues, buying your own equipment might be a better long-term investment. Ultimately, the choice is yours! Remember to always read the owner’s manual before operating any power equipment.
Section 4: Step-by-Step Guide on How to Dethatch a Lawn
So, you’ve determined your lawn needs dethatching – great! Now let’s get down to the nitty-gritty of actually doing it. This step-by-step guide will walk you through the process, from prepping your lawn to the post-dethatching care. Remember, a little preparation goes a long way!
Pre-Dethatching Lawn Preparation
Before you even think about tackling that thatch, you need to prepare your lawn. Think of it like prepping your canvas before painting a masterpiece (your lush, green lawn!). First, mow your lawn. Cut it to a slightly shorter height than usual. This will make it easier to see and access the thatch layer. (Trust me, you’ll thank me later!)

Next, water your lawn thoroughly. This will soften the thatch, making it easier to remove and reducing the risk of damaging your grass. Aim for a good soaking, not just a light sprinkle. You want the soil to be moist but not soggy.

Dethatching Techniques (manual and power tools)
Now for the fun part (or maybe not so fun, depending on your perspective!). You have a few options when it comes to dethatching tools.
Manual Dethatching (Rake): For smaller lawns or areas with a light thatch layer, a simple thatch rake can be effective. Work in overlapping strokes, pulling the rake backward and forward to lift and remove the thatch. This is a great workout, but it can be time-consuming, especially for larger lawns. Remember to go gently; you don’t want to rip up your grass!

Power Dethatching (Power Rake/Dethatcher): For larger lawns or thicker thatch, a power rake or dethatcher is a much more efficient option. These machines have rotating blades or tines that slice through the thatch layer. Always follow the manufacturer’s instructions carefully. Overlapping passes are crucial here too. Don’t rush the process.

“The key to successful dethatching is to remove only the thatch layer, not to damage the grass. Avoid aggressive passes, and work in small sections to maintain evenness.”
– Dr. Greenthumb, Turfgrass Expert
Which method is right for you? It really depends on the size of your lawn and the thickness of the thatch. If you have a large lawn and a thick thatch layer, renting a power dethatcher might be worthwhile. For smaller lawns and lighter thatch, a manual rake will suffice.
Post-Dethatching Lawn Care
You’ve done the hard work; now let’s ensure your lawn recovers beautifully. What a difference a little TLC makes! Remember this is a marathon, not a sprint, so give your lawn time.
Here’s a list of post-dethatching care tips:
- Clean up: Rake up all the removed thatch and dispose of it properly. Don’t compost it unless you’re certain it’s not diseased.
- Water thoroughly: Give your lawn a good watering to help it recover from the process.
- Fertilize (optional): Depending on the time of year and your lawn’s health, consider applying a light fertilizer to boost recovery. You should always follow the instructions on the fertilizer bag.
- Monitor: Keep an eye on your lawn for any signs of stress or damage. If you see anything concerning, seek professional advice.

And there you have it! You’ve successfully dethatch your lawn. Now, sit back, relax, and admire your handiwork. Remember to be patient. It takes time for a lawn to recover fully after dethatching. You might even want to give it some time before mowing again.
Section 5: Dethatching Lawn Costs: DIY vs. Professional Services
So, you’ve decided your lawn needs dethatching. Great! But now comes the question: do you tackle it yourself, or call in the professionals? Let’s break down the costs to help you make the best decision for your budget and time.
DIY Dethatching Cost Breakdown
Estimating the cost of DIY dethatching isn’t rocket science, but it does involve a few factors. First, you’ll need the right tools. You can rent a dethatching rake (around $30-$50 per day) or buy one (anywhere from $50 to well over $200 depending on quality and features). Then there’s the time investment. Let’s be honest, dethatching a lawn is hard work! It could easily take you a whole afternoon, maybe even a whole weekend depending on your lawn’s size. If you value your free time, that’s a hidden cost. (I know I do; I once spent an entire Saturday dethatching, and let’s just say I was pretty sore the next day!)
| Item | Cost Range |
|---|---|
| Dethatching Rake Rental | $30 – $50/day |
| Dethatching Rake Purchase | $50 – $200+ |
| Your Time | Priceless! (But consider the opportunity cost) |
Professional Dethatching Cost Breakdown
Hiring professionals will obviously cost more upfront, but it saves you time and effort. The cost varies considerably depending on several factors:
- Lawn size
- Type of dethatching equipment used
- Your location (labor costs differ regionally)
- The condition of your lawn (heavily thatched lawns may require more work)
- Whether additional services, like aeration, are included.
| Lawn Size (sq ft) | Average Cost Range |
|---|---|
| 1,000 – 2,000 | $100 – $300 |
| 2,000 – 4,000 | $200 – $500 |
| 4,000 – 6,000 | $400 – $800 |
| Larger lawns | Get a custom quote |
Choosing the Right Option for Your Budget
Let’s compare the costs in a simple table:
| Feature | DIY | Professional |
|---|---|---|
| Initial Cost | Low (rental) to moderate (purchase) | Higher |
| Time Investment | High | Low |
| Physical Effort | High | Low |
| Quality of Work | Potentially variable | Usually high |
So, which option is right for you? If you have a small lawn, plenty of time, and don’t mind some physical labor, DIY might be the more cost-effective route. But if you value your time, have a large lawn, or simply prefer to leave it to the experts, hiring a professional might be worth the extra expense. Ultimately, the best choice depends on your individual circumstances and priorities. Aren’t you glad we worked through this together? It’s always good to weigh your options!
When to Dethatch Your Lawn
Section 6: Benefits of Dethatching Your Lawn: Healthier, Happier Grass
So, you’re considering dethatching – fantastic! Let’s dive into why this seemingly simple process can make a world of difference for your lawn. You’ll be amazed at the transformation. We’re talking lush, green grass that’s the envy of the neighborhood. Think of it as a spring cleaning for your yard, but with far more rewarding results.
Improved Lawn Health
Let’s face it: a healthy lawn is a happy lawn. And dethatching is a key step in achieving that happiness. Why? Because that thick layer of thatch—dead grass, stems, and roots—acts like a suffocating blanket. It prevents essential elements from reaching your grass.
Here’s what you can expect after dethatching:
- Improved water penetration and drainage: Say goodbye to waterlogged patches and hello to evenly hydrated grass. (I’ve seen the difference firsthand—it’s incredible!) The water penetrates the soil efficiently, reaching the roots where it’s needed most.
- Increased air circulation to grass roots: Think of your grass roots as needing to breathe, just like we do. Dethatching allows for better air circulation, promoting healthy root growth.
- Enhanced nutrient uptake and fertilizer effectiveness: No more wasted fertilizer! With dethatching, your lawn absorbs nutrients more efficiently, leading to vibrant growth. You’ll actually see a return on your investment in lawn care.
Remember that before and after picture I mentioned? Here they are:
[Insert Before Image Here]
[Insert After Image Here]
The difference is dramatic, isn’t it?
Enhanced Aesthetics
Beyond the health benefits, dethatching drastically improves the visual appeal of your lawn. A healthy, well-maintained lawn adds curb appeal, increasing your property value. It also creates a more enjoyable outdoor space for relaxation and activities. Wouldn’t you rather walk barefoot on lush, green grass than a matted, brown mess?
Long-Term Benefits
The benefits of dethatching extend far beyond immediate improvements. It’s an investment in your lawn’s long-term health and vibrancy. Regular dethatching helps prevent disease, reduces pest problems, and leads to a more resilient lawn that can better withstand environmental stressors such as drought and extreme temperatures. Isn’t that peace of mind worth the effort?
“Dethatching is a crucial step in maintaining a healthy lawn. It’s like giving your grass a deep clean, allowing it to breathe and thrive. The long-term health benefits far outweigh the initial effort.” – Dr. Emily Carter, Horticultural Specialist
In short, dethatching your lawn is a simple yet highly effective practice. You’ll soon see a remarkable improvement in the health, beauty, and resilience of your grass. So, when are you planning to give your lawn some much-needed TLC?
Section 7: Common Mistakes to Avoid When Dethatching Your Lawn
So, you’re ready to tackle that thatch buildup and give your lawn a boost? Fantastic! But before you grab your dethatching tool, let’s talk about some common pitfalls to avoid. Getting it wrong can actually harm your lawn more than help it. Trust me, I’ve seen it happen! (And it wasn’t pretty). This section will guide you through preventing these mistakes and ensuring a successful dethatching experience.
Preventing Over-Dethatching
Over-dethatching is a real problem. It’s like over-zealously scrubbing a delicate piece of china – you end up doing more damage than good. Removing too much thatch exposes the soil, making your lawn vulnerable to erosion, drying out, and becoming susceptible to diseases and weeds. You might think, “More is better,” but that’s simply not true when it comes to dethatching.
Here are some common mistakes that lead to over-dethatching:
- Using a power rake too aggressively.
- Dethatching too frequently (more than once every few years).
- Ignoring the thatch layer’s thickness. A thin layer is often perfectly fine.
- Dethatching during excessively dry or wet conditions.
[Image: Example of a lawn damaged by over-dethatching – showing bare patches of soil]
Remember, a little thatch is actually beneficial. It provides insulation and helps retain moisture. The goal isn’t to completely eliminate it, but to reduce excessive buildup.
Avoiding Damage With Proper Technique
Incorrect tool selection and improper usage are other frequent issues. Using the wrong tool for your lawn type or using a power tool improperly can lead to scalping (removing too much grass), uneven dethatching, and general lawn damage.
[Image: Example of scalping damage caused by incorrect dethatching technique]
- Incorrect tool selection: A power rake might be too aggressive for a delicate lawn; a manual rake might be too time-consuming for a large area.
- Improper usage: Overlapping passes aren’t crucial, but missing spots is a common mistake! Also, be mindful of your dethatching depth; you don’t want to go too deep!
Importance of Post-Dethatching Maintenance
Don’t forget the aftercare! This is often overlooked, but it’s crucial for your lawn’s recovery and future health. Neglecting post-dethatching care can nullify all your hard work. What’s the point of all that effort if you don’t give your lawn the chance to heal?
- Water deeply and regularly after dethatching to help the lawn recover and promote new growth.
- Fertilize to replenish nutrients lost during the process.
- Consider overseeding to fill in any bare patches.
“Avoid common errors by carefully assessing your lawn’s thatch layer before beginning. Only dethatch when necessary, and use the appropriate tool and technique. Always prioritize a gentle, controlled approach.” – Experienced Gardener, Jane Doe
Let’s face it, dethatching can seem intimidating, but by avoiding these common mistakes, you can ensure a healthy, thriving lawn. So, grab your tools, but remember to proceed with caution and care. Your lawn will thank you for it!
When to Dethatch Your Lawn
Section 8: Dethatching and Overseeding: A Powerful Combination for Lawn Renewal
So, you’ve dethatched your lawn – fantastic! But you know what can really take your lawn from “okay” to “wow”? Overseeding. Let’s explore how these two processes work together synergistically to rejuvenate your turf. This isn’t just about removing thatch; it’s about building a thicker, healthier, more vibrant lawn.
The Benefits of Overseeding After Dethatching
Think of dethatching as spring cleaning for your lawn, removing the old, matted thatch that suffocates your grass. Overseeding, then, is like replanting your flowerbeds with fresh, vibrant blooms. It’s the perfect follow-up. By removing the thatch, you create the perfect environment for new grass seeds to germinate and thrive. You’re essentially giving those new seeds a fighting chance. The results are truly transformative!
What are the benefits of this dynamic duo? Let’s look at them:
- Improved grass density – A fuller, lusher lawn is what you’ll get.
- Enhanced weed control – New grass seeds outcompete weeds for space and resources.
- Better drought tolerance – A thicker lawn is more resilient to dry spells.
- Improved aesthetics – A noticeably greener and healthier looking lawn. (My neighbor’s lawn is proof of that! He did it last fall and it looked incredible all spring).
- Increased lawn resilience – A denser lawn is better equipped to handle foot traffic and wear.
Isn’t that a great list? I know I’m excited to get started!
A Combined Dethatching and Overseeding Strategy
Now, let’s get down to the nitty-gritty. Here’s a step-by-step guide to successfully combining dethatching and overseeding:
- Dethatch: First, thoroughly dethatch your lawn using a power rake or dethatching machine. (Make sure you don’t overdo it, though – you want to remove the thatch, not damage the soil.) [Insert Image: Dethatching process]
- Prepare the Soil: Lightly rake the area to loosen the soil and ensure good seed-to-soil contact.
- Spread the Seed: Use a spreader to distribute the grass seed evenly over your lawn. Follow the seed rate recommendations on your chosen seed package. [Insert Image: Overseeding process]
- Water Gently: Water lightly and frequently to keep the soil moist, ensuring optimal germination. This helps to keep the seeds from drying out.
- Maintain: Continue to water regularly and avoid heavy foot traffic until the seedlings are established.
Timing of Overseeding
The best time to overseed is generally in the early fall or late spring when temperatures are mild and rainfall is adequate. This timing allows the new grass to establish a strong root system before harsh winter or summer conditions.
But what if you missed the ideal window? Don’t worry! You can still overseed, even if it’s not the optimal time, you’ll just have to pay extra attention to watering and care. Don’t expect miracles though!
Here’s a quick table to help you make informed decisions about overseeding options:
| Overseeding Option | Cost (approximate) | Pros | Cons |
|---|---|---|---|
| Fescue (Fine/Tall) | $20-$40 per 50lbs | Excellent shade tolerance, low maintenance | Can be less drought-tolerant than others |
| Ryegrass | $15-$30 per 50lbs | Fast germination, good for overseeding | Can be less durable in extreme conditions |
| Kentucky Bluegrass | $30-$50 per 50lbs | Excellent color, durable | Slower germination, needs more sun |
Remember, a little planning and effort go a long way. Combining dethatching and overseeding is an investment in the long-term health and beauty of your lawn. So, are you ready to transform your lawn? I know I am!
So, you’ve reached the end of our journey into the world of dethatching lawn. Let’s recap. We’ve explored the telltale signs of thatch buildup – that spongy layer between your grass blades and the soil. We’ve discussed how to identify the ideal time to dethatch your lawn, focusing on spring and fall for optimal results and minimizing stress on your grass. Importantly, we examined different dethatching methods, from the satisfying rake to the power of a dethatching machine, emphasizing the importance of choosing the right tool for your lawn’s size and condition.
The main takeaway? Don’t jump into dethatching without a plan. Carefully assess your lawn. Is thatch truly a problem? If so, choose the right time and method. Over-dethatching can be just as damaging as neglecting it altogether. Remember that springtime, after new growth has begun, or autumn, before winter dormancy sets in, are generally your best bets for dethatching lawn successfully.
I’ve seen firsthand the transformation a properly dethatch lawn can undergo – going from a patchy, unhealthy mess to a vibrant, lush carpet. It’s truly rewarding! Think about your own lawn. Imagine the satisfaction of a healthy, thriving green space. It’s within your reach.
Moving forward, I recommend you schedule your dethatching now. Mark it on your calendar! Consider taking photos of your lawn before and after the process. This helps you track progress and adjust your approach in future seasons. And finally, let’s talk. What’s your biggest challenge when it comes to maintaining a healthy lawn? Share your experiences and questions in the comments below – I’d love to hear from you!
Frequently Asked Questions about Dethatching Your Lawn
How Often Should I Dethatch My Lawn: A Guide to Proper Lawn Maintenance?
Dethatching your lawn is important for its health, but how often you need to do it depends on your grass type and climate. Generally, most lawns benefit from dethatching every 2-3 years. However, if you notice significant thatch buildup (more than ½ inch), you might need to dethatch more frequently. Warm-season grasses like Bermuda and Zoysia might need it less often than cool-season grasses like Fescue and Ryegrass, which tend to accumulate thatch faster. Regular core aeration, which helps reduce thatch naturally, can also lengthen the time between dethatching. For example, if you aerate annually, you might only need to dethatch every 3-4 years. Keep an eye on your lawn’s health; if it starts showing signs of poor growth or yellowing despite proper fertilization, it’s time to consider dethatching.
What Should I Do If I Find That My Lawn Has Severe Thatch Buildup: Addressing Excessive Thatch?
Severe thatch buildup (over ½ inch) can suffocate your grass, preventing water and nutrients from reaching the roots. If you’ve discovered this problem, you’ll need a more aggressive approach than a simple dethatching rake. Consider renting a power rake or hiring a professional landscaper with specialized equipment. A power rake is more effective at removing thick layers of thatch. After power raking, be sure to overseed bare patches immediately to re-establish a healthy lawn. You can also choose to dethatch in sections, allowing for quicker recovery of your lawn and less stress on the grass itself. Remember to water deeply and consistently after dethatching to support the grass’s recovery. Following this procedure is key to successful lawn restoration after dealing with severe thatch.
Can I Dethatch My Lawn During a Drought: Dethatching and Water Conservation?
It’s best to avoid dethatching your lawn during a drought. Dethatching stresses the grass, and without adequate moisture, your lawn may struggle to recover. The process removes some of the natural protection that the thatch provides to the soil. The exposed soil and grass will be vulnerable to further dryness and potentially die off. Wait until you’ve had consistent rainfall or can provide supplemental watering for several weeks after dethatching. Deep watering before and after dethatching is crucial for successful lawn recovery. If you must dethatch during drier periods, consider limiting the area you dethatch to smaller sections, ensuring thorough watering between each section. This will allow you to dethatch while reducing the strain on your lawn.
What Type of Fertilizer Should I Use After Dethatching: Choosing the Right Fertilizer Post-Dethatching?
After dethatching, your lawn needs a boost. Use a slow-release fertilizer high in nitrogen to encourage healthy growth. A balanced fertilizer with a ratio such as 16-16-16 or a higher nitrogen-focused blend (like 20-10-10) works well. Avoid fast-release fertilizers, as they can burn the newly exposed soil. Look for fertilizers that are specifically designed for overseeding or lawn recovery. Applying fertilizer evenly prevents over-fertilization and ensures all areas of your lawn receive nourishment. Always follow the directions on the fertilizer packaging for proper application rates. For example, applying too much fertilizer can actually harm your lawn, so make sure you are using the correct amount for your lawn’s size.
How Long Does It Take for My Lawn to Recover After Dethatching: Lawn Recovery Time After Dethatching?
Recovery time after dethatching depends on the severity of thatch buildup, the time of year, and your post-dethatching care. In general, you can expect to see noticeable improvement within a few weeks. With proper watering and fertilization, you should see a full recovery within 4-6 weeks. However, depending on your climate and the damage done during the dethatching process, recovery could take longer. Keep in mind that the summer months can make recovery quicker, while cooler months can extend the time it takes for your lawn to recover from dethatching. If you notice any significant areas of bare spots after 6 weeks, it may be a good idea to overseed the areas to encourage new growth.
What Are the Signs That My Dethatching Efforts Were Successful: Recognizing a Healthy Lawn Post-Dethatching?
Successful dethatching results in a lawn that looks fuller, greener, and healthier. You should notice improved growth and better water penetration. The thatch layer should be significantly reduced, allowing for improved air circulation to the roots. If you were dealing with patchy, yellowed areas, you should see a lessening of these issues. The grass should feel softer underfoot and show fewer signs of thatch accumulation (e.g., spongy areas). Regular watering and fertilizing will ensure continued success. If your lawn is still showing signs of stress, such as brown patches or thinning, you might need to take further steps, including addressing soil compaction or pest problems.
Is Dethatching Harmful to My Lawn: Is Dethatching Harmful to My Lawn?
Dethatching itself isn’t inherently harmful, but improper techniques or timing can stress the lawn. Using the right tool for the job (rake for light thatch, power rake for heavy thatch) is crucial. Avoid aggressive dethatching, especially if you’re dealing with a thin or already stressed lawn. Proper pre- and post-dethatching care (watering, fertilization) is essential to minimize damage and promote quick recovery. Using a dethatching rake in the spring or fall (when the grass is actively growing) is generally a safer option compared to dethatching during hotter summer months. Ultimately, dethatching is a beneficial practice if carried out correctly and responsibly.