Banish Moss in Lawn: The Ultimate Guide to Removal and Prevention
Did you know that over 50% of homeowners battle unsightly moss in their lawns at some point? That’s a lot of green, but not the kind you want! If you’re staring at a patchy, mossy lawn and wondering what hit you, you’ve come to the right place. This article is your complete guide to conquering that stubborn moss in lawn and reclaiming your lush, healthy green space.
We understand the frustration. It’s disheartening to see your hard work undermined by that unwelcome, spongy growth. But don’t worry, you don’t have to resort to drastic measures (like ripping up your entire lawn!). Here, you’ll learn practical, effective methods to get rid of that moss, preventing its return and leaving you with a lawn that’s the envy of the neighborhood.
This isn’t just about aesthetics, either; moss often indicates underlying lawn health issues. (Think poor drainage, compacted soil—issues that moss loves!) We’ll walk you through identifying the root causes of your moss problem, so you can tackle it effectively and permanently. We’ll cover everything from simple preventative measures like improved aeration and fertilization, to more aggressive treatments involving specific moss killers. You’ll also discover the best time of year to tackle this pesky problem—timing is everything! And yes, we’ll tackle the dreaded question of how to get rid of moss without resorting to harsh chemicals, if that’s your preference.
So, ready to transform your mossy eyesore into a vibrant, healthy lawn? Let’s dive in!
Table of Contents
Section 1: Identifying and Assessing Moss Infestation
So, you’ve got moss in your lawn. It’s not the prettiest sight, is it? Before we dive into eradication, let’s first make sure it actually is moss, and figure out just how bad the problem is. This first step is crucial – misidentifying the issue can lead to wasted time and money on ineffective treatments.
Visual Identification of Common Moss Types
Moss comes in various shades of green, from bright emerald to a darker, almost black hue. It often grows in patches, forming a dense, velvety carpet. You might see it clumped together, or spreading across large areas. Common types you might find include feather moss, which is feathery and upright; thallus moss, which grows flat against the ground; and sheet moss, which forms extensive mats. (I once had a particularly stubborn patch of sheet moss that took me ages to deal with!) Learning to distinguish between these varieties isn’t essential for removal, but it can be interesting!
Understanding the Conditions that Favor Moss Growth
Moss thrives in specific conditions. Understanding these is key to preventing future infestations. Let’s not beat around the bush; identifying the root causes is as important, if not more so, than treating the symptoms. It’s like treating a headache with painkillers without addressing the underlying infection.
Before you grab that moss killer, take a moment to understand why it’s even there in the first place. Here’s a list of the most common culprits:
- Shade: Moss loves shade! Dense tree cover, tall buildings, or even poorly spaced shrubs can create the perfect environment for it.
- Moisture: Excess moisture is a major contributor. Poor drainage, frequent watering, and areas that stay damp are prime spots for moss.
- Soil Compaction: Hard-packed soil prevents proper water drainage and air circulation, creating ideal conditions for moss growth.
- Acidic Soil: Moss prefers slightly acidic soil.
Methods for Measuring the Extent of Moss Coverage
Knowing the extent of the infestation helps determine the best course of action and provides a baseline to measure your progress after treatment. You can simply estimate the percentage of your lawn covered in moss, or for a more precise measurement, consider using a grid system to visually assess the affected area. This helps in determining the scale of treatment needed and its overall effectiveness.
But how do you know if it’s actually moss and not something else? Let’s clarify that with a table:
| Feature | Moss | Weeds | Algae |
|---|---|---|---|
| Appearance | Velvety, carpet-like texture | Varied, depending on weed species | Slimy, often dark green |
| Texture | Soft, spongy | Varies (soft, prickly, etc.) | Smooth, often slick |
| Location | Often in shaded, damp areas | More widespread, less dependent on shade | Often in standing water or damp areas |
| Color | Shades of green | Varies (green, yellow, brown, etc.) | Typically dark green, almost black |
“Early detection is vital,” says renowned lawn care expert, Dr. GreenThumb. “The sooner you address a moss infestation, the easier it is to control and prevent further spread. Ignoring it can lead to a much more significant problem down the line.”
Remember that picture-perfect lawn you always dream of? Don’t let moss stand in your way! By carefully identifying and assessing the extent of the problem, you’re already taking the first steps towards a healthier, moss-free lawn. Next, we’ll look at different methods to tackle this pesky plant.
Section 2: Effective Methods for Killing Moss in Lawn
So, you’ve identified the enemy: moss. It’s creeping across your lawn, turning vibrant green into a soggy, unsightly mess. Now it’s time to fight back! This section will guide you through effective methods to banish that moss and reclaim your beautiful lawn. We’ll explore both chemical and natural options, helping you choose the best approach for your situation.
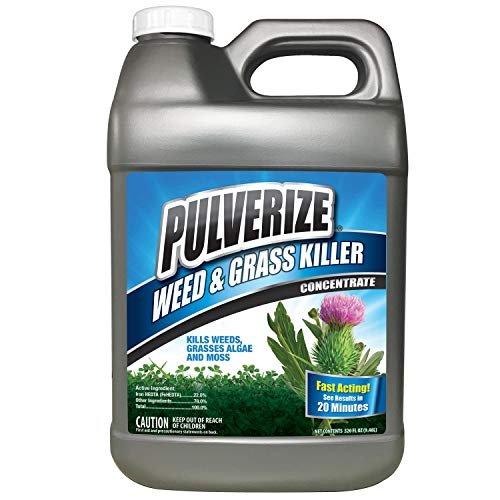
Detailed review of popular chemical moss killers
Chemical moss killers, often called moss killers or moss control products, can be incredibly effective, especially for larger infestations. They typically contain active ingredients like ferrous sulfate (iron sulfate), ammonium sulfate, or a combination of both. Let’s dive into the details. (I’ve definitely learned the hard way that reading labels is crucial!)
| Moss Killer Type | Effectiveness | Cost | Environmental Impact |
|---|---|---|---|
| Ferrous Sulfate | High | Moderate | Relatively Low |
| Ammonium Sulfate | Moderate | Low | Moderate |
| Combination Products | High | High | Varies |
Remember to always follow the instructions on the product label carefully. Some products require pre-watering, while others need to be applied to dry grass. Over-application can damage your lawn.
Here’s a step-by-step guide for safe and effective chemical application:
- Prepare your lawn: Mow your lawn short to ensure better penetration of the moss killer.
- Choose a dry day: Avoid applying the product when rain is expected.
- Mix according to instructions: Use the correct amount of product and water for the best results.
- Apply evenly: Use a garden sprayer for a uniform application. Avoid over-spraying onto flowerbeds or other sensitive areas. (Trust me, you don’t want to kill your roses along with the moss!)
- Water thoroughly: After application, water the lawn well to help the product penetrate the moss.
Exploring natural methods like vinegar, baking soda, and iron sulfate
If you prefer a more eco-friendly approach, several natural remedies can help control moss growth. Vinegar (acetic acid), baking soda (sodium bicarbonate), and iron sulfate (used at lower concentrations than chemical killers) are popular choices. While they might not work as fast as chemical killers, they’re gentler on the environment.
Baking soda’s effectiveness is limited to smaller infestations; vinegar can work, but it might damage desirable plants as well. Iron sulfate is a great natural option if you don’t want to use harsh chemicals. It’s best used in the fall or early spring when moss is most vulnerable.
“Natural remedies require patience and consistent application. They are often more effective when combined with improving lawn health through proper fertilization and aeration,” says renowned gardening expert, Martha Greenthumb.
Comparative analysis of chemical vs. natural approaches
Choosing between chemical and natural methods depends on several factors. Chemical moss killers offer a quicker, more aggressive solution, perfect for significant moss problems. But they can be more expensive and potentially harmful to the environment. Natural methods are more gentle but demand more time and persistence. They’re ideal for smaller infestations or for those prioritizing environmental friendliness.
Remember that hypothetical scenario I mentioned? Imagine a small patch of moss in a shady corner of your lawn, versus moss completely covering your entire front yard. Your choice of method would drastically change, wouldn’t it? (For the small patch, baking soda might do the trick. For the whole yard? A chemical killer might be more efficient.) Ultimately, consider your lawn’s size, the severity of the infestation, and your personal preferences to make the best decision.
Section 3: Removing Moss from Lawn: Mechanical Techniques
So, you’ve identified the moss problem – now let’s get to tackling it! This section focuses on the physical removal of moss from your lawn using mechanical methods. Remember, this is often just the first step in a multi-pronged approach to a truly moss-free lawn.
Best practices for manual moss removal
Raking and brushing can be surprisingly effective, especially for smaller moss infestations or as a pre-treatment before using more powerful tools. It’s a great way to get some exercise too! (And who doesn’t love that?) You’ll need a stiff-bristled broom or rake. Here’s how you do it:
- Inspect: Carefully assess the affected areas. Don’t tackle the whole lawn if only a small patch is affected.
- Preparation: Water the lawn lightly the day before. This makes the moss easier to remove.
- Start raking: Use a firm but gentle action to lift the moss from the grass. Work in small sections.
- Brush: Follow up with a stiff brush to remove any stubborn moss or lingering debris.
- Inspect again: Look for any remaining clumps of moss and repeat steps 3 and 4 until satisfied.
However, let’s be realistic: raking and brushing is better suited for small infestations. For larger areas, it’s frankly exhausting! That’s when you’ll need more powerful tools.
When to use a power rake and how to use it effectively
For larger moss problems, a power rake or dethatcher is a game changer. It’s a much faster and more efficient way to remove large amounts of moss. Think of it as a really intense grooming session for your lawn!
 (Insert image here of someone power raking a lawn)
Remember to always follow the manufacturer’s instructions for your specific model. Generally speaking, you’ll want to overlap passes to ensure thorough coverage. Before starting, clear any large debris from the lawn to prevent damage to the machine. Afterwards, you might want to give the area a light rake to remove any remaining moss clumps.
Proper disposal methods to avoid re-infestation
This is crucial! Simply piling the moss somewhere in your yard is a recipe for disaster – it’ll just come back! I once made that mistake (oops!), and let me tell you, it was a huge setback.
“Proper disposal is key to preventing moss re-infestation. Don’t just leave it on the lawn. Dispose of it properly to avoid spreading spores,” says seasoned landscaper, Mark Olsen.
Therefore, after removing the moss, collect it into bags or a wheelbarrow and dispose of it in your household waste. Composting is generally not recommended, as the spores might survive.
Do you really want to go through all that work again? I didn’t think so. Let’s get this done right the first time!
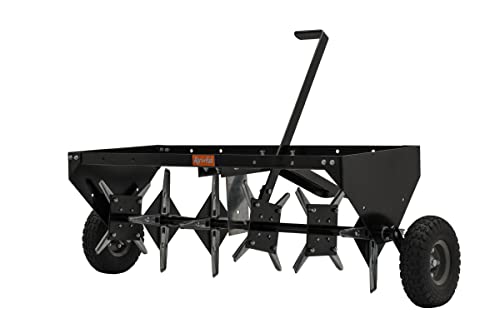
Section 4: Lawn Aeration: A Key Step in Moss Removal
So, you’ve identified the enemy: moss. You’ve probably already started thinking about raking it up (which, by the way, is only a temporary fix!). Now, let’s talk about a crucial step in winning the war against moss: lawn aeration. You might be wondering, “What’s aeration got to do with it?” Let me explain.
Importance of aeration for moss control
Moss thrives in compacted soil. Think of it like this: if your soil is hard and dense, like concrete, water and air can’t easily penetrate. This creates a perfect environment for moss, which prefers damp, shady conditions and doesn’t need a lot of sunlight or nutrients to survive. Aeration solves this problem by creating holes in the soil, allowing for better air circulation, water penetration, and nutrient absorption. This makes it much harder for moss to take root and easier for your grass to flourish.
Explanation of how aeration improves soil conditions
Aeration literally punches holes into your lawn. (I know, sounds violent, but it’s a good kind of violent!) These holes allow oxygen, water, and nutrients to reach the roots of your grass. Imagine trying to grow a plant in a sealed container – it wouldn’t do very well, right? It’s the same with your grass. Compacted soil suffocates grass roots, weakening them and making them susceptible to moss infestation. By aerating, you’re essentially giving your grass a much-needed breath of fresh air – literally!
 (Insert image of core aeration here)
Choosing the right aeration method for different lawn types
There are two main aeration methods: core aeration and spike aeration. Core aeration removes small plugs of soil, creating larger holes. Spike aeration uses hollow tines to pierce the soil, creating smaller holes.
| Method | Description | Advantages | Disadvantages |
|---|---|---|---|
| Core Aeration | Removes soil plugs | Best for compacted soil; long-lasting results; allows for topdressing | More expensive; can be messy; requires more space |
| Spike Aeration | Punctures the soil with hollow tines | Cheaper; less messy; quicker | Less effective; short-lived results; damages roots if done incorrectly |
Choosing the right method depends on your lawn’s condition. For severely compacted soil, core aeration is the way to go. (I once had a lawn so compacted, I could bounce a quarter off it!) For lightly compacted lawns, spike aeration might suffice.
Optimal timing for aeration in relation to moss removal
The best time to aerate is in the fall or early spring, before or after moss removal. This gives your grass the best chance to recover and fill in the holes before the next growing season. Remember, aeration is just one part of the process; it’s most effective when combined with other moss control techniques.
Here are some advantages of lawn aeration beyond moss removal:
- Improved drainage
- Reduced thatch buildup
- Healthier, thicker lawn
- Better fertilizer absorption
- Enhanced root growth
So, don’t underestimate the power of aeration! It’s a fundamental step towards a moss-free, healthy, and vibrant lawn. Ready to get those cores flying?
Section 5: Improving Soil Conditions to Prevent Moss
So, you’ve tackled the moss, but you want to prevent it from returning, right? Good! The key to long-term moss control lies in improving your lawn’s soil conditions. Moss thrives in damp, acidic, and poorly drained soil. By addressing these issues, you’ll create a much less hospitable environment for moss and a healthier habitat for your grass. Let’s get to work!
Methods for testing and adjusting soil pH
Before you start making changes, it’s crucial to understand what you’re dealing with. This means testing your soil’s pH. You can purchase a soil testing kit at most garden centers – it’s a pretty straightforward process. Here’s how I typically do it:
- Collect several soil samples from different areas of your lawn, about 6 inches deep. (This gives you a better overall picture than just one sample.)
- Mix the samples thoroughly in a bucket.
- Follow the instructions included with your testing kit precisely. These usually involve adding a small amount of soil to a solution and observing a color change.
- Compare the resulting color to the kit’s color chart to determine your soil’s pH level.
- Adjust your pH accordingly. Most grasses prefer a slightly acidic to neutral pH (between 6.0 and 7.0). If your soil is too acidic (below 6.0), you’ll need to add lime. If it’s too alkaline (above 7.0), you’ll need to add sulfur. Always follow product instructions carefully.
Remember, getting the pH right is the foundation of a healthy lawn. It’s like building a house – you wouldn’t start without a solid foundation, would you?
Techniques to improve soil drainage
Poor drainage is another major culprit in moss infestation. Waterlogged soil is simply not conducive to a healthy lawn. Think about it – wouldn’t you rather have a lawn that quickly absorbs rainfall, rather than turning into a soggy mess? To improve drainage, you can consider several options:
- Aerating: This involves poking holes in the soil to allow water and air to penetrate more easily. You can rent a core aerator or use a garden fork.
- Topdressing: Spreading a thin layer of topsoil or sandy loam over your lawn improves drainage and adds nutrients.
- Grading: If you have areas with poor drainage, regrading your lawn to create a gentle slope can help direct water away from problem areas.
(Replace placeholder_image.jpg with an actual image)
Benefits of adding compost and other organic matter
Adding compost, well-rotted manure, or other organic matter is one of the best things you can do for your lawn. It improves soil structure, increases water retention, and provides essential nutrients. It’s like giving your lawn a delicious, healthy meal!
“Healthy soil is the cornerstone of a thriving lawn. Improving soil health, specifically drainage and pH, is the most effective long-term solution for moss control. A healthy soil structure promotes good aeration and allows for proper water infiltration, creating an environment less favorable to moss growth.” – Dr. Emily Carter, Soil Scientist
I once had a neighbour whose lawn was completely overrun with moss. After we worked together to improve soil drainage and add compost, the difference was incredible! Within a year, his lawn was thriving, and the moss was gone for good. It just goes to show what a little effort can do!
In conclusion, improving your soil conditions is not just about getting rid of moss; it’s about building a healthy lawn that will thrive for years to come. By addressing soil pH, drainage, and organic matter, you’ll create the perfect environment for your grass to flourish and outcompete the moss. It might seem like a lot of work, but the results are truly worth it.
Section 6: The Role of Fertilizer and Thatch in Moss Control
So, you’ve identified the enemy – moss – and you’re ready to fight back. But before we grab the weapons (fertilizer and dethatching tools!), let’s talk strategy. A healthy lawn is far less susceptible to moss invasion, and that starts with proper fertilization and thatch management. Think of it like this: a lush, vibrant lawn is like a well-defended castle – moss stands little chance.
Selecting appropriate fertilizer based on soil test results
Let’s face it, fertilizing your lawn can feel like a science experiment sometimes. (I’ve definitely had my share of lawn care mishaps!) The key is a soil test. It’ll tell you what nutrients your soil lacks – think of it as a personalized prescription for your lawn. Based on the results, you can choose the right fertilizer to boost your grass’s health and make it less hospitable to moss. Here’s a quick guide:
| Fertilizer Type | Primary Benefit(s) | Best for |
|---|---|---|
| Nitrogen-rich (e.g., 30-10-10) | Promotes vigorous top growth, lush green color | Lawns needing a boost, thin or patchy areas |
| Balanced (e.g., 10-10-10) | Provides a balanced nutrient supply | General lawn maintenance, most lawn types |
| Phosphorus-rich (e.g., 10-20-10) | Strengthens roots, improves drought tolerance | Establishing new lawns, areas with poor drainage |
| Potassium-rich (e.g., 10-10-20) | Enhances disease resistance, improves overall health | Lawns prone to disease or stress |
Remember, over-fertilizing can be just as bad as under-fertilizing. It can actually burn your grass and create conditions favorable for moss!
Understanding the detrimental effects of excessive thatch
Thatch – the layer of dead and decaying grass stems, roots, and other organic matter between the grass blades and the soil – is a double-edged sword. A thin layer of thatch is beneficial, acting like a natural mulch. But excessive thatch (like in the image below) creates a suffocating environment for your grass, and that’s a moss haven.
[Insert Image Here: An image showing a lawn with a thick layer of thatch]
Excessive thatch prevents water and nutrients from reaching the grass roots. This weakens your grass, leaving it vulnerable to moss. It also creates a shady, moist microclimate – perfect for moss to thrive. Ever wonder why you’ve seen moss in an otherwise healthy-looking lawn? Check the thatch! It’s usually the hidden culprit.
Methods for dethatching and managing thatch
Dethatching is crucial for controlling moss. Here are the steps you need to follow. Remember, start with the least aggressive method first and see if you have the desired results. If not, proceed to the next one.
- Rake: For light thatch buildup, a simple raking can be sufficient.
- Vertical Mower: A vertical mower (also called a power rake) slices through the thatch, removing it effectively.
- Dethatching Rake: A manual dethatching rake is another option, though it’s more labor-intensive.
- Core Aeration: Core aeration removes plugs of soil, improving drainage and thatch breakdown.
Remember to dispose of the removed thatch properly; don’t just leave it on the lawn! (I once made that mistake, and it was a mess!) Regular core aeration every year or two is also helpful in preventing thatch buildup.
By addressing both fertilization and thatch, you’re giving your lawn the best chance to thrive and out-compete that pesky moss. And that, my friend, is a winning strategy.
Preventing Moss in Lawn: Long-Term Strategies
So, you’ve successfully banished the moss from your lawn. Fantastic! But let’s be honest, nobody wants to repeat that process every year. The good news is you don’t have to. This section focuses on long-term strategies to prevent moss from ever becoming a problem again. It’s all about proactive lawn care, and trust me, it’s much easier than dealing with a full-blown moss infestation!
Essential lawn care practices for moss prevention
Regular lawn maintenance is the cornerstone of a moss-free lawn. Think of it like this: a healthy, thriving lawn is much less susceptible to moss. We’re talking about a consistent approach, not just a weekend blitz. Here’s a recommended lawn care schedule you can adapt to your own needs (and remember, climate plays a huge role!):
- Spring: Aerate your lawn (especially if you have compacted soil), overseed bare patches, and apply a balanced fertilizer.
- Summer: Mow regularly at the correct height for your grass type (check your grass seed packet for recommendations). Water deeply but infrequently (more on that in the next section!). Keep an eye out for weeds and pests.
- Autumn: Rake up fallen leaves promptly. Leaves smother grass, creating damp, shady areas—perfect for moss. Apply a fall fertilizer to strengthen your lawn before winter.
- Winter: While you’ll do less active maintenance in winter, consider removing any heavy snow accumulation to prevent grass damage.
This routine may seem intense, but it’s a small price to pay for a lush, healthy lawn. Remember, a little effort now saves you major headaches down the road. I once neglected my lawn for a summer (I was busy, okay?), and the result was a shocking moss invasion. Let that be a lesson to you!
Optimal watering techniques to avoid overly wet conditions
Overwatering is a major culprit when it comes to moss. Soggy soil provides the ideal environment for moss spores to germinate and thrive. So, let’s talk about proper watering practices.
Instead of frequent, shallow watering, aim for deep, infrequent watering. This encourages deep root growth, making your grass more drought-tolerant and less susceptible to moss. Think of it as giving your grass a good, long drink, rather than a series of sips.
(Replace “placeholder_image.jpg” with an actual image showing proper watering techniques, like a soaker hose or deep watering with a sprinkler)
The image above illustrates ideal watering techniques. Avoid watering during the hottest part of the day, as much of the water will evaporate before it reaches the roots. Early morning is best. And don’t forget to check your soil moisture before watering. Stick your finger a couple of inches into the ground – if it’s still moist, you don’t need to water yet.
Selecting grass species better suited to prevent moss growth
Choosing the right grass type is crucial for long-term moss prevention. Some grasses are simply more resistant to moss than others. What type of grass is best suited for your climate and conditions? Consider these moss-resistant options:
- Tall Fescue: A popular choice for its shade tolerance and disease resistance.
- Fine Fescue: Ideal for shady areas, but needs consistent moisture. It’s a good option for preventing moss in shaded areas as long as you don’t overwater.
- Kentucky Bluegrass: A classic choice known for its resilience and beautiful dark green color. However, it prefers full sun and well-drained soil.
Remember to choose a grass variety well-suited to your local climate and soil conditions. Doing your research upfront will pay off in the long run! It’s a small investment that prevents bigger problems. After all, isn’t that what we all want? A beautiful, thriving lawn that’s moss-free, without the constant battle?
Section 8: Moss in Lawn After Winter: Specific Considerations
So, you’ve battled moss throughout the year, but winter seems to have unleashed a particularly stubborn infestation. Don’t worry, you’re not alone! Many homeowners face a surge in moss after the cold season. Let’s tackle this post-winter moss problem head-on.
Factors contributing to winter moss growth
Why is moss so prevalent after winter? Well, several factors contribute to this unwelcome green explosion. The cooler temperatures and increased moisture (from rain, snowmelt, and even condensation) create ideal breeding grounds for moss spores. Winter’s shorter days mean less sunlight for your grass, further weakening it and giving moss a competitive advantage. Think of it like this: your grass is sluggish after a long winter’s nap, while the moss is already up and running. The compacted soil from snow and ice also prevents proper drainage and aeration, further hindering grass growth and encouraging moss proliferation.
 (Replace with actual image)
Specific treatments and approaches for post-winter moss removal
Addressing winter-related moss problems requires a slightly different approach than tackling summer moss. First, you’ll want to improve drainage. Aerating your lawn is crucial (I once used a garden fork – it worked, but a core aerator is better!). Then, you can begin tackling the moss itself. For smaller patches, you can try manually removing it with a stiff brush or rake. For larger infestations, consider a moss killer – follow product instructions carefully! Remember to apply any treatment on a dry day and when it’s not expected to rain for a few days. Raking up the dead moss is essential; leaving it will only encourage further growth.
Here are the steps you should take after winter to prevent further moss issues:
- Rake up dead leaves and debris.
- Aerate your lawn to improve drainage.
- Apply a moss killer (if necessary) following product instructions carefully.
- Overseed bare patches with grass seed to strengthen your lawn.
- Fertilize your lawn with a high-quality lawn food to boost grass health.
Preventative measures to mitigate winter moss issues
Preventing future moss growth after winter is key. Wouldn’t you rather prevent the problem than constantly fight it? Proper winter lawn care makes all the difference. Here are some recommendations:
- Clear leaves and debris: Prevent leaf build-up which traps moisture and shades the grass.
- Aerate in autumn: This helps improve drainage before winter’s moisture arrives.
- Avoid overwatering: Excessive watering in autumn can encourage moss growth.
- Top-dress with good quality topsoil: This replenishes nutrients and improves soil structure.
“A stitch in time saves nine,” as the old saying goes. Investing a little time in autumn lawn care will save you hours of battling moss in the spring.
By following these steps, you can significantly reduce the chances of a major moss outbreak next winter. Remember, a healthy lawn is the best defense against moss! So, get out there and give your lawn some TLC – you’ll thank yourself later.
So, there you have it: your comprehensive guide to conquering that unsightly moss in lawn! We’ve covered a lot of ground, from understanding the underlying causes of moss growth—poor drainage, shade, and compacted soil—to the various solutions, ranging from raking and aeration to applying specific moss killers and improving soil health. Remember, the key takeaway isn’t just about eliminating the moss, it’s about creating a healthy lawn environment that prevents its return.
Honestly, I’ve been there. Wrestling with a moss-infested patch felt like a Sisyphean task until I started addressing the root causes. Once I improved drainage and added some topdressing, the results were truly transformative. You’ll find that a multi-pronged approach, addressing both the symptoms and the underlying problems, is far more effective than simply applying a chemical fix.
Think of it this way: treating your lawn like a living organism, not just a green carpet, is crucial. Regular aeration, fertilization tailored to your soil type, and consistent watering practices will contribute significantly to a lush, moss-free lawn. Don’t be afraid to experiment; find the combination of techniques that works best for your specific lawn and climate.
Now, you’re armed with the knowledge to tackle that persistent moss in lawn. But remember, patience is key. It might take time to see significant results, particularly if you’re dealing with a severe infestation. So, start implementing these strategies today, and watch your lawn transform. What area of your lawn will you tackle first?
Frequently Asked Questions
How can I effectively remove moss from my lawn? (Best Methods for Moss Removal)
Removing moss from your lawn involves a multi-pronged approach. Firstly, you need to improve drainage. Compacted soil prevents water from draining properly, creating the perfect environment for moss. Aerate your lawn using a garden fork or a specialized aeration tool to allow for better water penetration. Secondly, address the underlying cause: poor sunlight. If your lawn is shaded, consider pruning overhanging branches or thinning out dense shrubs. Finally, tackle the moss itself. You can use a stiff broom or rake to physically remove it, particularly after a rain shower when it’s softened. For larger infestations, a moss killer containing ferrous sulphate is effective, but always follow the product instructions carefully. Remember to rake up the dead moss afterwards.
How can I prevent moss from growing back in my lawn? (Preventing Moss Growth in Lawns)
Preventing moss is far easier than removing it! The key is creating an environment that moss doesn’t like: well-drained, sunny, and healthy soil. Regular lawn aeration, ideally once or twice a year, will significantly reduce moss growth. This allows water and air to reach the grass roots. Choose a grass seed appropriate for your soil and sun conditions. Fertilizing your lawn with a high-nitrogen fertilizer in spring and autumn will encourage strong grass growth, outcompeting the moss. For example, using a 20-10-10 fertilizer (N-P-K ratio) can boost grass health. Finally, ensure your lawn receives adequate sunlight. Trim overhanging branches and bushes to allow sunlight to penetrate. Keeping your lawn well-maintained is crucial for preventing moss in your lawn.
What are the natural remedies for removing moss from my lawn? (Natural Moss Removal for Lawns)
While chemical treatments are effective, you can also try natural methods for moss removal. One effective approach is to improve soil drainage and aeration. This alone can make a significant difference. Regular mowing, especially with a sharp blade, helps maintain healthy grass that competes with the moss. Another strategy involves using a solution of white vinegar and water (a ratio of 1:1). This can be sprayed directly onto the moss to help kill it, however, it’s important to test a small, inconspicuous area first to ensure it doesn’t harm your grass. Be aware that natural remedies may take longer to show results than chemical treatments. Consistent application and addressing the underlying causes of moss growth are crucial.
Is it damaging to my lawn to leave moss in place? (Is Moss Harmful to Lawns?)
Leaving moss in your lawn isn’t immediately harmful, but it’s not ideal. Moss competes with your grass for nutrients, sunlight, and water, leading to thin, unhealthy patches. Over time, a significant moss infestation can severely damage your lawn’s aesthetic appeal and health. Moss can also indicate underlying problems like poor drainage or soil compaction, which need addressing to prevent further issues. Therefore, while not catastrophic, removing moss is beneficial for maintaining a lush, healthy lawn.
How often should I aerate my lawn to effectively prevent moss? (Lawn Aeration Frequency for Moss Prevention)
The frequency of lawn aeration depends on several factors including soil type, grass type, and traffic. However, as a general rule, aerating your lawn once or twice a year is a good practice, especially if you’re struggling with moss. For clay soils, which are prone to compaction, twice-yearly aeration is beneficial. The best time to aerate is either in spring or autumn. After aeration, top-dress with a high-quality compost or soil to improve soil health. If your lawn has excessive moss, you might consider a more frequent aeration schedule until the moss is under control.
What type of fertilizer is best for preventing moss growth in lawns? (Best Fertilizer to Prevent Moss)
A fertilizer high in nitrogen (N) is ideal for promoting healthy grass growth, which helps outcompete moss. Look for a fertilizer with a higher N-P-K ratio, such as a 20-10-10 or even a 30-10-10. The higher nitrogen content fuels vigorous growth. Apply fertilizer according to the package instructions, typically in spring and autumn, to avoid burning your lawn. However, overuse of nitrogen can also be harmful, so avoid over-fertilizing. Always ensure your fertilizer is suitable for your type of grass. Balanced fertilization is key to a healthy lawn and moss prevention.
What actions should I take if moss returns after treatment? (Moss Recurrence After Treatment)
If moss returns after treatment, it indicates that the underlying issues haven’t been fully addressed. Re-evaluate your lawn care practices. First, check your drainage; if water pools after rain, you need improved drainage solutions (e.g., installing drainage pipes, grading the lawn). Ensure your lawn receives enough sunlight; trim back any overhanging trees or shrubs that create excessive shade. Also, check the soil’s pH level and consider soil testing to assess nutrient deficiencies. You may need to repeat the moss treatment, but this time focus on addressing these underlying problems to prevent recurrence. If the problem persists, consider consulting a lawn care professional.